Friday, December 30, 2011

18 The Finishing Touches

After two years of planning and construction, the house is nearing completion.


^ December 2011: Front Facade

^ View from the Garden

^ Close-up of the Pool

Sunday, June 12, 2011

17 The Transformation Journey

Over the course of construction, the facade of the house continued to transform, integrating modern tropical design while retaining the architectural detailing of the original 1960s architecture.

^ March 2009
^ January 2010
^ September 2010
^ September 2010
^ January 2011
^ April 2011

^ May 2011

^ May 2011

^ June 2011


Sunday, March 20, 2011

16 Cooling With Water

A water feature helps to cool down the breeze that flows into the house thereby reducing the ambient temperature.
Pic 1: Preparing the site for the water feature

Pic 2: An area measuring 8 feet wide, 25 feet long and 3.5 feet deep was carved out to prepare for the laying of concrete

Pic 3: Securing the reinforced steel over the piping in preparation for the pouring of concrete.

Pic 4: Four cubic meters of concrete was used for the base of the pool.

Pic 5: The completed concrete pool

Pic 6: Tiling the pool

Pic 7: Close-up of the partially tiled pool
Pic 8: Completed stone work and water spout

Pic 9: Close-up of stone work

15 Green Tech Competition Award


The Green Tech Competition 2010 with the theme, “Green Technology, Green Lifestyle”, was organised by The Ministry of Energy, Green Technology and Water together with GreenTech Malaysia.

The competition called on the public to showcase how they practiced green technology in their daily lives based on the theme and keywords of the challenge which included:

• Green Technology
• Environment
• Green Building
• Social
• Renewable Energy
• Waste Management
• Energy Efficiency
• Water Management
• Sustainability
• Green Economy
• Transportation

The Ho Residence was awarded the 2nd Prize in its category with the winning entry entitled "Green My Home."

Pic 1: Dato' Sri Peter Chin Fah Kui, Minister of Energy, Green Technology & Water Malaysia delivering his opening address at the Award Ceremony in conjunction with the Green Community Day on 13 March 2011

Pic 2: The VIPs posing for photos with the Award Winners

Pic 3: On stage to accept the Award from the CEO of Green Tech Malaysia, Dr. Nazily Mohd. Noor

Pic 4: A quick pose for photographers after accepting the award

Pic 5: The winning entry displayed for public viewing

Monday, March 14, 2011

14 Solar Shading

Locally manufactured ventilation blocks proved to be an effective solution to screen out the harsh western sun without obstructing the natural flow of wind through the house.  The ventilation blocks also act as a privacy screen.  The design pattern was inspired from traditional Chinese lattice screens.

Pic 1: View of the South Wing from the garden

Pic 2: View of the South Wing from the Living Room

Pic 3: View of the South Wing from the first floor balcony

Pic 4: View from inside the South Wing

Pic 5: View from inside the dining area

Pic 6: View from the back of the dining area

Pic 7: View from the front of the first floor Lanai

Pic 8: Solar shading on the first floor balcony and ground floor patio

Pic 9: View from inside the Lanai

Pic 10: View from the Garden

Tuesday, December 28, 2010

13 The Art of Plastering

Plastering is a highly skilled job.  It is also back-breaking and laborious.  Any construction worker can prepare and mix plaster but the application is usually left to a skilled "sifu."  Much of the effort lies in the preparation of the "level markings" to ensure that the final results will produce a flat and even wall.

 
Pic 1: These little blobs of plaster which could easily be overlooked by the untrained eye, are part of the methodical process of the skilled plasterer when preparing a wall for plastering.  These "markers" indicate the plaster thickness required at that spot.  When combined with up to a dozen other markers on any given wall, they provide fairly accurate level guides during the plastering process.

Pic 2: A master plasterer at work.  He is usually assisted by another lay worker who prepares the plaster mix and hands it to him in batches.  To ensure a good and even finish, the entire wall should be plastered at one go.

Pic 3: A wall before and after it has been plastered.

Plastering the ceiling requires a different set of skills and is usually performed by a different set of workers.  It is no less tedious and back breaking since it requires the worker to arch over and work over head while balancing precariously on scaffolding which at times, can be several storeys high.

Pic 4: Two types of pre-made plaster boards as base material - normal (on the left) and moisture proof for external areas (on the right).

Pic 5: Mild steel framework mounted in place prior to fixing the plaster boards.

Pic 6: A completed section of plaster ceiling after it has been touched up to hide the visible joints.

Pic 7: External plaster ceiling works being carried out on the 2nd floor back facade of the house.

Pic 8: Scaffolding setup to facilitate plaster ceiling works on the front roof over hang.

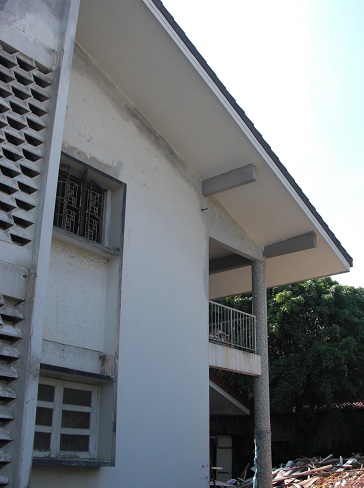
Pic 9: A completed section of the plaster ceiling works on the front roof over hang.

Pic 10: Front facade of the house showing the partially completed plaster ceiling works on the roof over hang.

Sunday, December 26, 2010

12 Recycle, Recycle, Recylce

The saying "old is gold" couldn't be more true especially when considering two important building materials - wood and steel.

By today's standards, tropical hardwood is more expensive than cement and concrete per square foot.  Thus, it made a lot of environmental sense to recycle as much of the "Balau" wood which was used for the roof trusses and prevent it from ending up as landfill.

Pic 1: Removing the original roof tiles exposed the "Balau" wood roof trusses which remained in excellent condition even after 50 years.

Pic 2: The roof trusses were carefully dismantled and sorted according to length.

Pic 3: Any nails or metal objects were removed by hand and then planed using an electric hand planer.

Pic 4: Once planed, the natural grain and colour of the "Balau" wood was clearly visibly.

Pic 5: Each piece was then given a quick protective coating, cut to size and hoisted in place to form the new floor beams.

Pic 6: Close-up view of the floor beams using recycled "Balau" wood.

Pic 7: View of the loft with the floor beams in place and ready for the floor boards to be installed over it.

Pic 8: Bamboo plywood used as underlay for the floor boards.  Bamboo is a renewable product and resistant to termites due to its tough fibers.

Pic 9: The original "Balau" door frames were also re-fitted throughout the house.

Pic 10a & 10b: Vintage steel casement windows and grilles dating back to 1960s were salvaged from an old bungalow and re-fitted in the bedrooms.

Pic 11: Solid steel bars salvaged from the original louvered window grilles will be incorporated into the new grilles.